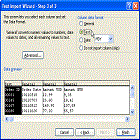
If the text to
be imported is not in a recognized format, then Excel will automatically launch the Text Wizard to give you
assistance.
You
can import data using the following methods:
 Open command : From the main
menu, choose File → Open to display the Open
dialog box, and select the data file type from the File of
type dropdown list. The selected file will be translated by Excel and imported
as an Excel spreadsheet.
 Export data into
text files :
From the database application where your data is stored,
you
can usually export the data you want into text files. You can then import these text
files using the Text Import Wizard.
 Microsoft Query : This program is
shipped with Microsoft Excel, and is an excellent
tool for querying an external database. Queries allow you
to specify the exact data you want from the external database.
 Pivot Tables : Pivot Tables are
useful for accessing and integrating external databases into
Excel.
Importing
Text Files
You can import text from other sources, saving the need to
re-enter the data. To import text into
Excel, it must be in a format that can be recognized by Excel. The Text Import Wizard is a set of dialog boxes
that guide you through the customization of imported text.
 Importing Text Files into Excel
You can import text from other sources, saving the need to
re-enter the data. To import text into
Excel, it must be in a format that can be recognized by Excel.
The following text file formats are supported
by Excel:
 Text :Text files are plain text with no formatting information
except line returns.
Usually
this file type contains one record of information per line, but the means of
identifying the fields in a record varies.
 Text (Tab
Delimited):With this text file format,
tabs are used to identify fields in a
record.
  Formatted Text: Formatted text files make use of position to define fields;
each field starts
at a defined position on the line. You
may find this field type also referred to as Space Delimited, Fixed Width, or
Column Delimited.
  Comma Separated
Values (CSV): Commas are used by CSV text
files to delimit
(separate)
fields. Although these files are called
Comma Separated Values text files, commas are not always used as the
delimiter. Examples of other delimiters
include vertical bars (|) and at signs (@).
The Text Import Wizard is a set of dialog boxes that guide you through the customization
of
imported text. To import text follow these steps:
 From the
main menu, choose File → Open to
display the Open dialog box.
  From the
Files of type dropdown list, select Text Files (*.prn, *.txt, *.csv).
  Select
the file you want to open.
  Click Open to display the Text Import Wizard - Step 1 of 3 dialog
box:
Excel will analyze the selected text file, and determine
the file's data type, and display a
preview of the data to be imported. In
the above example, Excel determined the file to be a Delimited
file.
You can choose to alter the file type selection as
needed. If your file contains header rows
that you do not want imported, you can change the Start import at row number to exclude the header rows. When you change the Start import at row number, the preview will be updated to reflect
the change.
 Having made your choices click Next and the Text Import
Wizard Step 2 of 3) dialog box is displayed.
The upper half of this box allows you to select the required field delimiter.
The default is Tab.
Make
the appropriate choice(s) as more than one can be selected. I.e. select items, such
as Space, Comma or Tab.
When you have chosen your delimiter, the data displayed in
the lower half of the dialog box (Data Preview area) shows the effect.
 Click on the Next
button when the data as you want. The Text Import Wizard (Step 3 of
3 ) dialog box is displayed.
You can now select the data format for each of the columns.
Also decide whether you wish to import a column or not.
 When you
have made your decisions click on the Finish
button to import the text into
your
spreadsheet.


No comments:
Post a Comment