 Using AutoShapes Clip Arts and Pictures Cropping or Trimming Pictures Wrapping Text Around a Picture

AutoShapes are pre-drawn shapes that offer an easy
alternative to drawing your own shapes. AutoShapes come in several shape
categories including Lines, Connectors, Basic Shapes, Block
Arrows, Flowcharts, Stars and Banners, and Callouts.
AutoShapes can be inserted into your sheet
through the AutoShapes menu on the Drawing toolbar, or through the AutoShapes toolbar.
► To display the AutoShapes toolbar:
From the main menu, select Insert
→ Picture→ AutoShapes

► To add an
AutoShape:
1- Click on the
down arrow next to the AutoShape icon on the Drawing toolbar:

2- Select the shape item from the AutoShape menu, for
example, Stars and Banners.
3-
Click on the shape style you want to add.
4-
Click on the sheet and drag
the mouse pointer until you get the desired shape.
5-
To end the drawing, release
the mouse button.
6-
To add text inside the shape,
click it and then begin typing.
OR right-click on the shape and select add text then begin
type your text.

♣AutoShape
♣Clip Arts and Pictures
You can insert clip arts and pictures in
your sheet from the Clip Gallery that comes with Office XP. You can also insert
pictures you import from other programs and locations. Clip Art includes
drawings, photos, sounds, videos, and other media files that you can use in
your sheet.
♣Inserting Clips and Pictures
The Insert
Clip Art pane lets you search
for Clip Art in your collection, access the Clip Organizer, and insert Clip Art
into your sheet.
► To display the insert Clip Art pane:
● From the main menu, select Insert → Picture → Clip Art:

●To search for Clip Art:
1-
Enter descriptive keywords to
search for clips in the Search text box.
2-
Click Search.
3-
To do another search, click
the Modify button at the bottom of the task pane.
● To insert Clip Art:
1-
From the main menu, select Insert → Picture
→ Clip Art.
2-
Click on the clip you want.
OR
click on the down arrow next to the clip you want and click Insert.

● To insert a picture from a file:
1- From the main
menu, select Insert → Picture → From File. This will open the Insert Picture dialog box.

2- Browse your files and when you locate
the picture you want, select it and click Insert.
♣Cropping or Trimming Pictures
You can crop a graphic to cut off areas
that you don’t want to show. By moving the boundaries of a graphic outward, you
can also add white space around a graphic.
1- Select the
picture you want to crop. The Picture toolbar will be displayed, if it is not, display it through the command
(View → Toolbars
→ Pictures):

2-
On the Picture toolbar, click
the Crop button 
3-
Position the cropping tool
over a sizing handle and drag.
♣ Wrapping Text Around a Picture
1-
Select the picture you want
to wrap text around.
2-
On the Format menu, click
Picture. The Format Picture dialog box will appear.
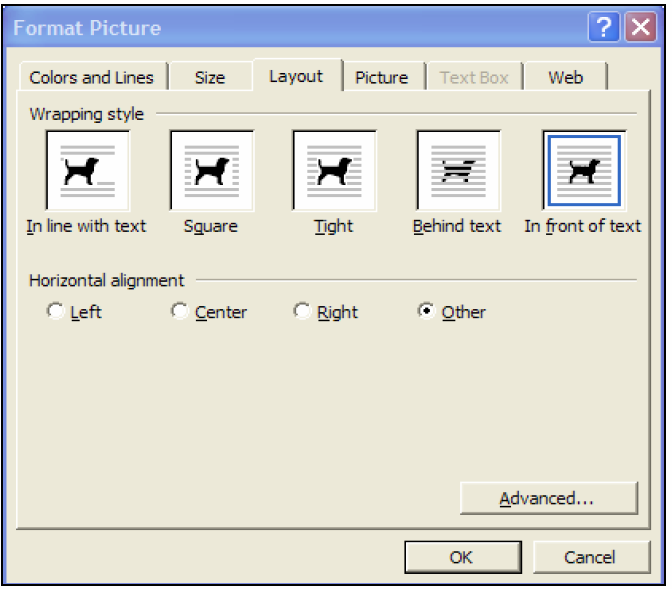
3-Click the Layout tab.
4-
Under Wrapping style, click the wrapping option you want.
5-For more text-wrapping options, click Advanced, and then
click the Text Wrapping tab. The Advanced Layout dialog box will appear:

6-Click the text-wrapping style you want.
7- Under Distance
from text, specify the distance between the text box or graphic and the text
that surrounds it
● To apply more formats on the Clip Arts and pictures:
1-
Double click the picture you
want to format. This will open a Format Picture dialog box.
OR
right-click on the picture and select format picture.
2-
Click on the Colors and
Lines, Size, Position, Picture, Text Box, or Web tab.
3-
Make the changes you want and
click OK.
I'm on the fence about this, while more customization is good, I have a feeling this is a "in-progress" update, it just feels incomplete and half-way there.
ReplyDeleteWe use badge layout for apps on design approvals (visual projects), so the image being displayed is important. Old layout "feels like" it had larger images,
maybe because the images were cropped more loosely so it's easier to tell which project it was at quick glance. Now the image is cropped closer, making it
harder to scan thru at quick glance. I find myself needing to click into the project more often than usual. Which makes the whole user experience less
efficient.
I have a couple suggestions that might make it work better:
1. Increase the height of the window the cover image is being displayed.
2. Let us to choose which image to be displayed as "cover" (like how Pinterest handles cover images of each board, was hoping for this for a long time)
3. Let us adjust which part of the image to show and how tight or loose the crop is (with a fixed window, let us move the image around and maybe enlarge or
shrink it to control what shows thru the window. Pinterest does a limited form of this, which is very useful in making the cover image relevant)
4. Allow Cover Image to be ordered in different hierarchy (currently every element can be ordered differently except the Cover Image, it seems to be stuck
in the 2nd spot, would like the option to set it on another spot in the layout. This one seems like an easy fix, since you guys allow that for every other
element already)