 SENDING WORKBOOKS Sending Workbooks for Review Sending a Worksheet as Attachment Routing a Workbook Routing a Workbook to the Next Recipient
You can use Excel to send your Workbook to
other people for review and comment.
1- Open the
Workbook you want to send.
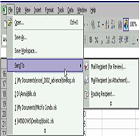
2- From the main menu, choose File → Send to → Mail Recipient (for
Review). This
brings
up a new message with the Workbook attached from your default email program.
3- Enter
the recipients you want to include.
4- Customize
your email subject and message.
5- Click Send.
 Sending a Worksheet as Attachment
 Routing a Workbook
 Routing a Workbook to the Next Recipient
|
NOTE: This feature, when
used with Microsoft Outlook, will turn on change
tracking and help you with
Workbook merging.
|
You
can use Excel to share your Workbook with other people using an email
attachment.
1- Open the
Workbook you want to send.
2- From the main menu, choose File
→ Send
to → Mail Recipient (as Attachment) .
This brings up a new message with the Workbook attached
from your default email program.
3- Enter
the recipients you want to include.
4- Customize
your email subject and message.
5- Click Send.
|
NOTE: You can attach only a selection of a Workbook. Begin by opening the
Workbook you want to send
and selecting the range you want to send.
If asked
Whether you want to send
the entire Workbook or just the selection, click Send,
and the selection will
appear in the body of the message.
|
When you send a Workbook for review, all mail recipients
receives their own copy of the message and Workbook. This requires you to merge their comments and
changes at the end of the review.
Alternatively, you can route
a Workbook. With routing, only one
copy of the Workbook passed from recipient to recipient. In order for this function to work, all
recipients must use Microsoft Outlook
as their email program.
While
the Workbook is being routed, you can keep track of its progress. At the end of the routing, the Workbook with
its changes is returned to you.
1- Open the
Workbook you want to send.
2- From the
main menu, choose File → Send to → Routing Recipients.
3- Enter
the routing recipients you want to include.
4- Customize
your email subject and message.
5- Click Route.
When you receive a routed Workbook, you can review the
file, add your comments, and send the routed Workbook to the next recipient.
1- Open the
routed Workbook by following the instructions provided by your email
program.
2- Review
the Workbook.
3- Add
comments or make changes as needed.
4- From the
main menu, choose File → Send to → Next Routing
Recipient.
5- Click Route.
No comments:
Post a Comment