 Manipulating Data&Formatting Columns and Rows
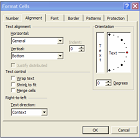 The Alignment tab of the Format Cells dialog gives you
great control over how your text is aligned and orientated; also, you can use
the icons on theFormatting toolbar to align the text.
The Alignment tab of the Format Cells dialog gives you
great control over how your text is aligned and orientated; also, you can use
the icons on theFormatting toolbar to align the text.
»Aligning Data Horizontally
within a CellYou can easily align your data
horizontally within a cell. Begin by selecting the cell or range you want to
affect. Click one of the following icons on the formatting toolbar:

Align Left: align data to
the left edge
of the cell.

Center: align data in the center of the cell.
.png)
Align Right: align data
to the right edge
of the cell.
»Aligning Data Vertically within
a Cell
1-
Select the cell or range you want to align.
2-
Right-click
on the selection, choose Format Cells from the pop-up menu to display the
Format Cells dialog box.
3-
Click on the Alignment
tab.
4-
Select the alignment type you want from the
Vertical drop-down menu:

5-Click OK to apply the selected
alignment.
»Centering a
Heading over Multiple Columns
1-
Select the cell containing the heading and the
cells you want the heading to be centered
over.
2-
Click on the Merge
and Center icon on the Formatting toolbar:

3-The cells are now displayed as one:

»Wrap Multiple
Lines of Data in a Cell
1-
Select the cell or range you want to wrap.
2-
Right-click
on the selection, choose Format Cells from the pop-up menu to display the
Format Cells dialog box.
3-
Click on the Alignment
tab.
4-
Select the Wrap Text checkbox, and click OK:

» Indenting Data within a Cell
You can easily indent your data within a cell. Begin by
selecting the cell or range you want to affect; click one of the following
icons on the formatting toolbar:

Decrease Indent: decrease the indent by one level.

Increase Indent: increase the indent by one level.

» Changing the Text Orientation
1-
Select the cell or range whose orientation you
want to change.
2-
Right-click
on the selection, choose Format Cells from the pop-up menu to display the
Format Cells dialog box.
3-
Click on the Alignment
tab.
4-
You can change the Orientation of the text by
entering the exact value in the Degrees
spin box or drag the Text
dial to set the level of rotation:

5-Click OK to apply the format:
»Formatting
Columns and Rows
Column width and Row height can be changed numerically and
visually.
»Changing the Column Width
Numerically
1-
Select the column(s) whose width you want to
change.
2-
From the main menu, choose Format →
Column Width to
display the
Column Width dialog box:

3-Enter a new value (from 0-255
characters) in the Column width text box, and click OK:
»Changing the Column Width
Visually
1-
Select the column heading of the column whose
width you want to change.
2-
Placing the mouse over the right border of
column heading (your mouse pointer will
change to ╬ ),
and drag the column border to the width you want:


No comments:
Post a Comment